7 Transformers库使用
学习目标
- 了解并掌握管道方式完成基本NLP任务
- 了解并掌握自动模型方式完成基本NLP任务
- 了解并掌握具体模型方式完成基本NLP任务
7.1 Transformers库介绍
Huggingface总部位于纽约,是一家专注于自然语言处理、人工智能和分布式系统的创业公司。他们所提供的聊天机器人技术一直颇受欢迎,但更出名的是他们在NLP开源社区上的贡献。Huggingface一直致力于自然语言处理NLP技术的平民化(democratize),希望每个人都能用上最先进(SOTA, state-of-the-art)的NLP技术,而非困窘于训练资源的匮乏。同时Hugging Face专注于NLP技术,拥有大型的开源社区。尤其是在github上开源的自然语言处理,预训练模型库 Transformers,已被下载超过一百万次,github上超过24000个star。
Huggingface Transformers是基于一个基于transformer模型结构提供的预训练语言开源库。它支持Pytorch,Tensorflow2.0,并且支持两个框架的相互转换。Transformers提供了NLP领域大量state-of-art的预训练语言模型结构的模型和调用框架。
框架支持了最新的各种NLP预训练语言模型,使用者可快速的进行模型调用,并且支持模型进一步预训练(further pretraining)和下游任务微调(fine-tuning)。举个例子Transformers库提供了很多SOTA的预训练模型,比如BERT, GPT-2, RoBERTa, XLM, DistilBert, XLNet, CTRL。
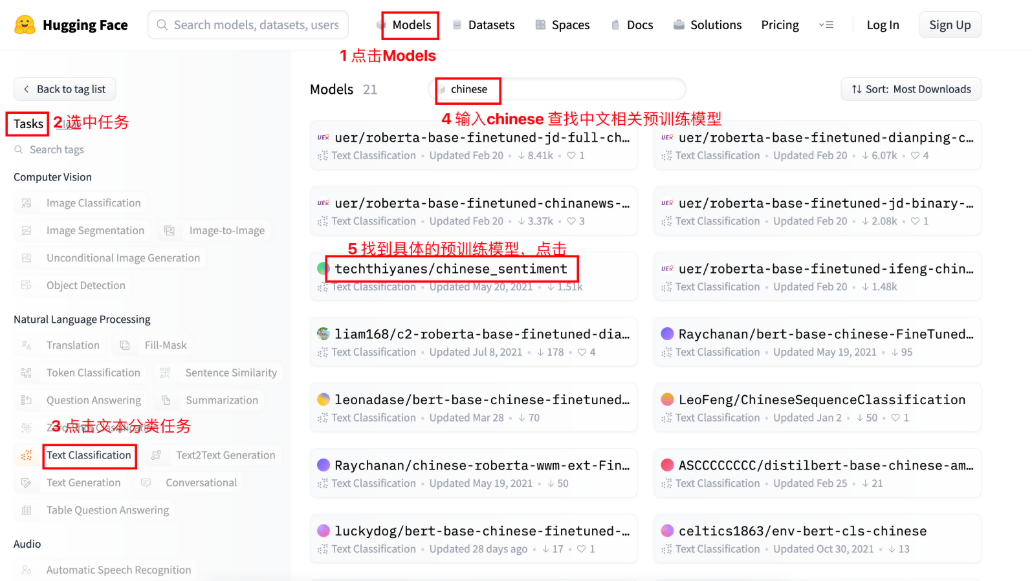
社区Transformer的访问地址为:https://huggingface.co/,见下图。

备注:
- 点击Model链接可查看、下载预训练模型。点击Datasets链接可查看、下载数据集。点击Docs链接可以阅读预训练模型的编程文档,十分方便
- SOTA(state-of-the-art)是指目前对某项任务“最好的”算法或技术
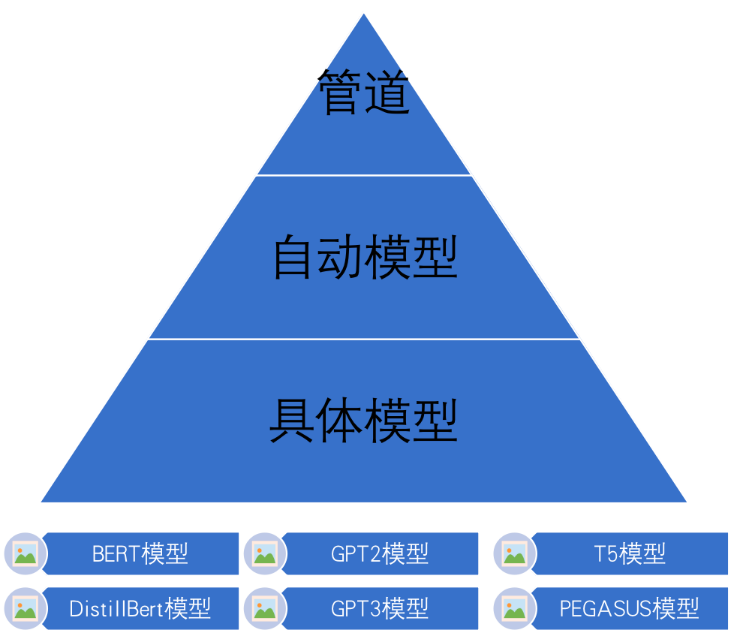
7.2 Transformers库三层应用结构
管道(Pipline)方式:高度集成的极简使用方式,只需要几行代码即可实现一个NLP任务。
自动模型(AutoMode)方式:可载入并使用BERTology系列模型。
具体模型(SpecificModel)方式:在使用时,需要明确指定具体的模型,并按照每个BERTology系列模型中的特定参数进行调用,该方式相对复杂,但具有较高的灵活度。
7.3 管道方式完成多种NLP任务
python解析器中安装transformers和datasets包:
Bash# 需要新建conda虚拟环境,再安装模块,否则会和其他包版本冲突 # 直接安装transformers最新版本即可 pip install transformers -i https://mirrors.aliyun.com/pypi/simple/ pip install datasets -i https://mirrors.aliyun.com/pypi/simple/管道方式(Pipeline)是指通过将一系列预定义的步骤(如数据预处理、特征工程、模型训练、评估等)串联起来,形成一个固定的处理流程。这种方式通常由工程师或数据科学家设计,并在开发过程中精心调整每个步骤。
一种高级API,封装了模型的加载、预处理、推理和后处理过程,用户只需几行代码即可完成复杂的任务。
如果你需要快速完成一个任务,或者对模型细节不感兴趣,管道方式是最佳选择。
优点:
- 快速上手:无需了解模型细节,适合初学者或快速实验。
- 代码简洁:只需几行代码即可完成复杂任务。
- 任务多样化:支持多种NLP任务,无需额外配置。
缺点:
- 灵活性差:无法自定义模型的加载、预处理或后处理过程。
- 性能开销:由于封装了多个步骤,可能会增加额外的计算开销。
- 不适合定制化需求:如果需要修改模型结构或训练过程,管道方式不适用。
7.3.1 文本分类任务
文本分类是指模型可以根据文本中的内容来进行分类。例如根据内容对情绪进行分类,根据内容对商品分类等。文本分类模型一般是通过有监督训练得到的。对文本内容的具体分类,依赖于训练时所使用的样本标签。
# 导入工具包
import torch
from transformers import pipeline
import numpy as np
# 情感分类任务
def dm01_test_text_classification():
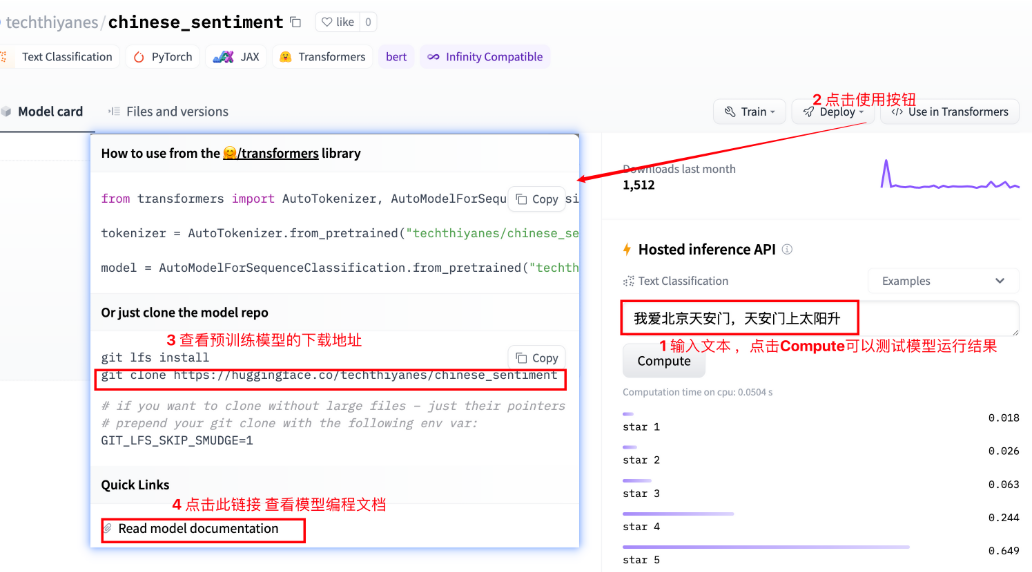
# 1 使用中文预训练模型chinese_sentiment
# 模型下载地址 git clone https://huggingface.co/techthiyanes/chinese_sentiment
# 2 实例化pipeline对象
# techthiyanes/xxx 官网自动下载路径
# my_model = pipeline(task='sentiment-analysis', model='techthiyanes/chinese_sentiment')
my_model = pipeline(task='sentiment-analysis', model='model/chinese_sentiment')
# 3 文本送给模型 进行文本分类
output = my_model('我爱北京天安门,天安门上太阳升。')
print('output--->', output)
输出结果:
pipeline函数可以自动从官网下载预训练模型(techthiyanes/xxx),也可以加载本地的预训练模型
transformer库中预训练模型查找和下载:
7.3.2 特征提取任务
特征抽取任务只返回文本处理后的特征,属于预训练模型的范畴。特征抽取任务的输出结果需要和其他模型一起工作。
def dm02_test_feature_extraction():
    # 1 下载中文预训练模型 git clone https://huggingface.co/bert-base-chinese

    # 2 实例化pipeline对象 返回模型对象
    my_model = pipeline(task='feature-extraction', model='model/bert-base-chinese')

    # 3 给模型送数据 提取语句特征
    output = my_model('人生该如何起头')
    print('output--->', type(output), np.array(output).shape)
输出结果:
- 不带任务头输出:直接使用预训练模型的原始输出,不添加额外的任务适配层。
- 输出形式:
- 对于BERT等编码器模型:输出通常是每个输入token的上下文表示(即token级别的嵌入向量)。
- 对于GPT等解码器模型:输出通常是每个位置的下一个token的概率分布。
- 适用场景:
- 特征提取:将模型的输出作为其他任务的特征输入。
- 预训练模型的中间表示分析。
- 需要自定义任务头的场景。
- 特征抽取任务属于不带任务头输出,bert-base-chinese模型的9个字,每个字的特征维度是768。
- 输出形式:
- 带任务头输出:在预训练模型的输出之上添加一个任务适配层(如全连接层、分类层等),将模型的输出映射到任务特定的目标空间。
- 输出形式:
- 对于分类任务:输出类别概率分布。
- 对于回归任务:输出连续值。
- 对于序列标注任务:输出每个token的标签概率分布。
- 适用场景:
- 文本分类(如情感分析)。
- 序列标注(如命名实体识别)。
- 机器翻译、问答等生成任务。
- 其他有指定任务类型的比如文本分类,完型填空属于带任务头输出,会根据具体任务类型不同输出不同的结果。
- 输出形式:
7.3.3 完型填空任务
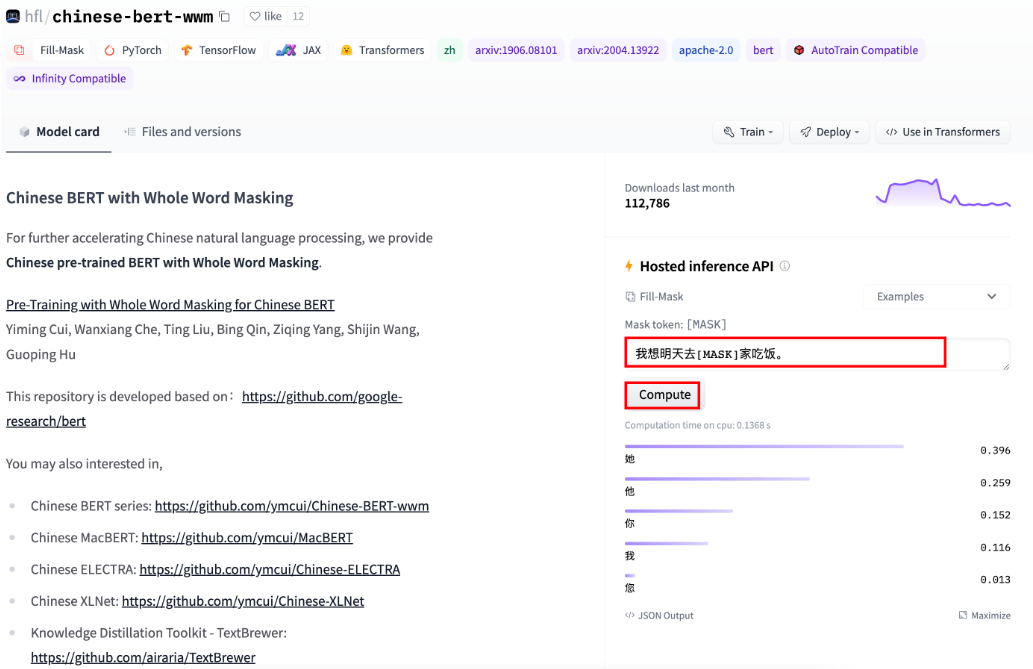
完型填空任务又被叫做“遮蔽语言建模任务”,它属于BERT模型训练过程中的子任务。下面完成一个中文场景的完型填空。
# 完型填空任务
def dm03_test_fill_mask():
    # 1 下载预训练模型 全词模型git clone https://huggingface.co/hfl/chinese-bert-wwm

    # 2 实例化pipeline对象 返回一个模型
    my_model = pipeline(task='fill-mask', model='model/chinese-bert-wwm')

    # 3 给模型送数据 做预测
    input = '我想明天去[MASK]家吃饭。'
    output = my_model(input)

    # 4 输出预测结果
    print('output--->', output)
输出结果:
output--->
[{'score': 0.3955858051776886, 'token': 1961, 'token_str': '她', 'sequence': '我 想 明 天 去 她 家 吃 饭 。'},
 {'score': 0.25917506217956543, 'token': 800, 'token_str': '他', 'sequence': '我 想 明 天 去 他 家 吃 饭 。'},
 {'score': 0.15245680510997772, 'token': 872, 'token_str': '你', 'sequence': '我 想 明 天 去 你 家 吃 饭 。'},
 {'score': 0.11629136651754379, 'token': 2769, 'token_str': '我', 'sequence': '我 想 明 天 去 我 家 吃 饭 。'},
 {'score': 0.013154905289411545, 'token': 2644, 'token_str': '您', 'sequence': '我 想 明 天 去 您 家 吃 饭 。'}]
可以在官网在线查找完型填空结果:
7.3.4 阅读理解任务
阅读理解任务又称为“抽取式问答任务”,即输入一段文本和一个问题,让模型输出结果。
# 阅读理解任务(抽取式问答)
def dm04_test_question_answering():
    # 问答语句
    context = '我叫张三,我是一个程序员,我的喜好是打篮球。'
    questions = ['我是谁?', '我是做什么的?', '我的爱好是什么?']

    # 1 下载模型 git clone https://huggingface.co/luhua/chinese_pretrain_mrc_roberta_wwm_ext_large

    # 2 实例化化pipeline 返回模型
    model = pipeline('question-answering', model='model/chinese_pretrain_mrc_roberta_wwm_ext_large')

    # 3 给模型送数据 的预测结果
    output = model(context=context, question=questions)
    print('output--->', output)
输出结果:
output--->
[{'score': 1.2071705397451171e-12, 'start': 2, 'end': 4, 'answer': '张三'},
 {'score': 2.608926251923549e-06, 'start': 9, 'end': 12, 'answer': '程序员'},
 {'score': 4.1686785579031493e-08, 'start': 18, 'end': 21, 'answer': '打篮球'}]
7.3.5 文本摘要任务
摘要生成任务的输入一一段文本,输出是一段概况、简单的文字。
# 文本摘要任务
def dm05_test_summarization():
    # 1 下载模型 git clone https://huggingface.co/sshleifer/distilbart-cnn-12-6

    # 2 实例化pipline 返回模型
    my_model = pipeline(task='summarization', model="model/distilbart-cnn-12-6")

    # 3 准备文本 送给模型
    text = "BERT is a transformers model pretrained on a large corpus of English data " \
          "in a self-supervised fashion. This means it was pretrained on the raw texts " \
          "only, with no humans labelling them in any way (which is why it can use lots " \
          "of publicly available data) with an automatic process to generate inputs and " \
          "labels from those texts. More precisely, it was pretrained with two objectives:Masked " \
          "language modeling (MLM): taking a sentence, the model randomly masks 15% of the " \
          "words in the input then run the entire masked sentence through the model and has " \
          "to predict the masked words. This is different from traditional recurrent neural " \
          "networks (RNNs) that usually see the words one after the other, or from autoregressive " \
          "models like GPT which internally mask the future tokens. It allows the model to learn " \
          "a bidirectional representation of the sentence.Next sentence prediction (NSP): the models" \
          " concatenates two masked sentences as inputs during pretraining. Sometimes they correspond to " \
          "sentences that were next to each other in the original text, sometimes not. The model then " \
          "has to predict if the two sentences were following each other or not."
    output = my_model(text)

    # 4 打印摘要结果
    print('output--->', output)
输出结果:
output---> [{'summary_text': ' BERT is a transformers model pretrained on a large corpus of English data in a self-supervised fashion . It was pretrained with two objectives: Masked language modeling (MLM) and next sentence prediction (NSP) This allows the model to learn a bidirectional representation of the sentence .'}]
7.3.6 NER任务
实体词识别(NER)任务是NLP中的基础任务。它用于识别文本中的人名(PER)、地名(LOC)、组织(ORG)以及其他实体(MISC)等。例如:(王 B-PER) (小 I-PER) (明 I-PER) (在 O) (办 B-LOC) (公 I-LOC) (室 I-LOC)。其中O表示一个非实体,B表示一个实体的开始,I表示一个实体块的内部。
实体词识别本质上是一个分类任务(又叫序列标注任务),实体词识别是句法分析的基础,而句法分析优势NLP任务的核心。
# NER任务
def dm06_test_ner():
    # 1 下载模型 git clone https://huggingface.co/uer/roberta-base-finetuned-cluener2020-chinese

    # 2 实例化pipeline 返回模型
    model = pipeline('ner', model='model/roberta-base-finetuned-cluener2020-chinese')

    # 3 给模型送数据 打印NER结果
    output = model('我爱北京天安门,天安门上太阳升。')
    print('output--->', output)
输出结果:
# B:Begin,表示实体的开始。
# I:Inside,表示实体的中间部分。
# O:Outside,表示非实体部分。
output--->
[{'entity': 'B-address', 'score': 0.8689394, 'index': 3, 'word': '北', 'start': 2, 'end': 3},
 {'entity': 'I-address', 'score': 0.8195262, 'index': 4, 'word': '京', 'start': 3, 'end': 4},
 {'entity': 'I-address', 'score': 0.4701734, 'index': 5, 'word': '天', 'start': 4, 'end': 5},
 {'entity': 'I-address', 'score': 0.73964596, 'index': 6, 'word': '安', 'start': 5, 'end': 6},
 {'entity': 'I-address', 'score': 0.6812198, 'index': 7, 'word': '门', 'start': 6, 'end': 7},
 {'entity': 'B-address', 'score': 0.5543188, 'index': 9, 'word': '天', 'start': 8, 'end': 9},
 {'entity': 'I-address', 'score': 0.46039864, 'index': 10, 'word': '安', 'start': 9, 'end': 10},
 {'entity': 'I-address', 'score': 0.43023208, 'index': 11, 'word': '门', 'start': 10, 'end': 11}]
7.4 自动模型方式完成多种NLP任务
自动模型方式(AutoModel)是一种自动化流程,旨在减少人工干预,通过智能化算法自动选择模型、调整超参数、选择特征等,以自动化的方式构建最佳机器学习模型。
一种中级API,允许用户更灵活地加载模型和分词器,并手动控制推理过程。
如果你需要定制化模型、优化性能或进行更复杂的实验,自动模型方式更适合。
优点
- 灵活性强:用户可以完全控制模型的加载、推理和后处理过程。
- 适合定制化需求:支持修改模型结构、训练过程或添加自定义逻辑。
- 性能优化:可以手动优化推理过程,减少不必要的计算开销。
缺点
- 代码复杂度高:需要更多的代码来实现完整的推理流程。
- 学习曲线陡峭:需要了解模型和分词器的工作原理。
- 不适合快速实验:对于简单的任务,使用管道方式更高效。
7.4.1 文本分类任务
import torch
from transformers import AutoTokenizer
from transformers import AutoModelForSequenceClassification


# 情感分类任务
def dm01_test_text_classification():
    # 1 自动加载预训练的分词器
    # # techthiyanes/xxx 官网自动下载路径
    # my_tokenizer = AutoTokenizer.from_pretrained('techthiyanes/chinese_sentiment')
    my_tokenizer = AutoTokenizer.from_pretrained('model/chinese_sentiment')

    # 2 自动加载序列分类模型
    # my_model = AutoModelForSequenceClassification.from_pretrained('techthiyanes/chinese_sentiment')
    my_model = AutoModelForSequenceClassification.from_pretrained('model/chinese_sentiment')

    # 3 文本转张量
    message = '人生该如何起头'

    # 3-1 return_tensors='pt' 返回是二维tensor
      # padding=True 填充到批次中最长的序列的长度
    msg_tensor1 = my_tokenizer.encode(text=message, return_tensors='pt',
                    padding=True, truncation=True)
    print('msg_tensor1--->', msg_tensor1)

    # 3-2 不用return_tensors='pt'是一维列表
    msg_list2 = my_tokenizer.encode(text=message, padding=True,
                  truncation=True)
    print('msg_list2--->', msg_list2)
    msg_tensor2 = torch.tensor([msg_list2])
    print('msg_tensor2--->', msg_tensor2)

    # 4 数据送给模型
    # 4-1
    my_model.eval()
    output1 = my_model(msg_tensor2)
    print('情感分类模型头输出outpout1--->', output1)
    # 4-2
    output2 = my_model(msg_tensor2, return_dict=False)
    print('情感分类模型头输出outpout2--->', output2)
    # 4-3
    prob = torch.softmax(output2[0], dim=-1)
    class_id = torch.argmax(prob, dim=-1).item()
    print('分类idclass_id--->', class_id)
    print(model.config.id2label[class_id])
输出结果:
msg_tensor1---> tensor([[ 101,    782, 4495, 6421, 1963,    862, 6629, 1928,    102]])
msg_list2---> [101, 782, 4495, 6421, 1963, 862, 6629, 1928, 102]
msg_tensor2---> tensor([[ 101,    782, 4495, 6421, 1963,    862, 6629, 1928,    102]])
情感分类模型头输出outpout1---> SequenceClassifierOutput(loss=None, logits=tensor([[-2.7387, -1.7528,    0.2273,    2.0507,    1.4128]],
             grad_fn=<AddmmBackward0>), hidden_states=None, attentions=None)
情感分类模型头输出outpout2---> (tensor([[-2.7387, -1.7528,    0.2273,    2.0507,    1.4128]],
             grad_fn=<AddmmBackward0>),)
分类idclass_id---> 4
star 5
# 注1:101代表[CLS] 102代表[SEP]
-
AutoTokenizer、AutoModelForSequenceClassification函数可以自动从官网下载预训练模型,也可以加载本地的预训练模型
-
AutoModelForSequenceClassification类管理着分类任务,会根据参数的输入选用不同的模型
-
AutoTokenizer的encode()函数使用return_tensors=’pt’参数和不使用pt参数对文本编码的结果不同
-
AutoTokenizer的encode()函数使用padding=’max_length’可以按照最大程度进行补齐,俗称打padding
-
调用模型的forward函数输入return_dict=False参数,返回结果也不同
7.4.2 特征提取任务
from transformers import AutoModel

# 特征提取任务-不带任务输出头的任务
def dm02_test_feature_extraction():
    # 1 加载tokenizer
    my_tokenizer = AutoTokenizer.from_pretrained(pretrained_model_name_or_path='model/bert-base-chinese')

    # 2 加载模型
    my_model = AutoModel.from_pretrained(pretrained_model_name_or_path='model/bert-base-chinese')

    # 3 文本转张量
    message = ['你是谁', '人生该如何起头']
    # encode_plus() 的主要功能是将原始文本转换为模型所需的输入格式,包括:
    # 分词(Tokenization)
    # 添加特殊标记(如 [CLS] 和 [SEP])
    # 转换为 ID 序列(input_ids)
    # 生成注意力掩码(attention_mask)
    # 填充(padding)或截断(truncation)到指定长度
    msgs_tensor = my_tokenizer.encode_plus(text=message, return_tensors='pt', truncation=True,
                pad_to_max_length=True, max_length=30)
    print('msgs_tensor--->', msgs_tensor)

    # 4 给模型送数据提取特征
    my_model.eval()
    output = my_model(**msgs_tensor)
    print('不带模型头输出output--->', output)
    # last_hidden_state表示最后一个隐藏层的数据
    print('output.last_hidden_state.shape--->', output.last_hidden_state.shape)    # torch.Size([1, 30, 768])
    # pooler_output表示池化,也就是对最后一个隐藏层再进行线性变换以后平均池化的结果,分类时候使用。
    print('output.pooler_output.shape--->', output.pooler_output.shape)    # torch.Size([1, 768])
输出结果:
msgs_tensor--->
# 1 input_ids对两个句子text2id以后的结果,
# 101表示段落开头,第一个102代表第一个句子结束,第二个102代表第二个句子结束
# 后面的0表示 按照编码要求pad_to_max_length=True和max_length=30补充pad零
{'input_ids': tensor([[ 101,    872, 3221, 6443,    102,    782, 4495, 6421, 1963,    862, 6629, 1928,
                    102,        0,        0,        0,        0,        0,        0,        0,        0,        0,        0,        0,
                        0,        0,        0,        0,        0,        0]]),
# 2 token_type_ids表示段落标志0代表第一个句子,1代表第二个句子
 'token_type_ids': tensor([[0, 0, 0, 0, 0, 1, 1, 1, 1, 1, 1, 1, 1, 0, 0, 0, 0, 0, 0, 0, 0, 0, 0, 0,
                 0, 0, 0, 0, 0, 0]]),
# 3 attention_mask表示注意力机制的掩码数据,1表示有真实数据,0表示是pad数据需要掩码
 'attention_mask': tensor([[1, 1, 1, 1, 1, 1, 1, 1, 1, 1, 1, 1, 1, 0, 0, 0, 0, 0, 0, 0, 0, 0, 0, 0,
                 0, 0, 0, 0, 0, 0]])}

# 1 last_hidden_state表示最后一个隐藏层的数据 [1,30,768]
# 2 pooler_output表示池化,也就是对最后一个隐藏层再进行线性变换以后平均池化的结果,分类时候使用。
不带模型头输出output---> BaseModelOutputWithPoolingAndCrossAttentions(
    last_hidden_state=tensor([[[ 0.7001,    0.4651,    0.2427,    ...,    0.5753, -0.4330,    0.1878],
                 [ 0.4017,    0.1123,    0.4482,    ..., -0.2614, -0.2649, -0.1497],
                 [ 1.2000, -0.4859,    1.1970,    ...,    0.7543, -0.2405, -0.2627],
                 ...,
                 [ 0.2074,    0.4022, -0.0448,    ..., -0.0849, -0.0766, -0.2134],
                 [ 0.0879,    0.2482, -0.2356,    ...,    0.2967, -0.2357, -0.5138],
                 [ 0.4944,    0.1340, -0.2387,    ...,    0.2375, -0.1011, -0.3314]]],
             grad_fn=<NativeLayerNormBackward>),
    pooler_output=tensor([[ 0.9996,    1.0000,    0.9995,    0.9412,    0.8629,    0.9592, -0.8144, -0.9654,
                    0.9892, -0.9997,    1.0000,    0.9998, -0.1187, -0.9373,    0.9999, -1.0000,
                 ...,
                 -0.9967,    1.0000,    0.8626, -0.9993, -0.9704, -0.9993, -0.9971,    0.8522]],
             grad_fn=<TanhBackward>),
    hidden_states=None, past_key_values=None, attentions=None, cross_attentions=None)

outputs.last_hidden_state.shape---> torch.Size([1, 30, 768])
outputs.pooler_output.shape---> torch.Size([1, 768])
7.4.3 完型填空任务
from transformers import AutoModelForMaskedLM

# 完型填空任务
def dm03_test_fill_mask():
    # 1 加载tokenizer
    modelname = "model/chinese-bert-wwm"
    # modelname = "model/bert-base-chinese"
    my_tokenizer = AutoTokenizer.from_pretrained(modelname)

    # 2 加载模型
    my_model = AutoModelForMaskedLM.from_pretrained(modelname)

    # 3 文本转张量
    input = my_tokenizer.encode_plus('我想明天去[MASK]家吃饭.', return_tensors='pt')
    print('input--->', input)

    # 4 给模型送数据提取特征
    my_model.eval()
    output = my_model(**input)
    print('output--->', output)
    print('output.logits--->', output.logits.shape) # [1,12,21128]

    # 5 取概率最高
    mask_pred_idx = torch.argmax(output.logits[0][6]).item()
    print('打印概率最高的字:', my_tokenizer.convert_ids_to_tokens([mask_pred_idx]))
输出结果:
# 1 input_ids 对句子text2id以后的结果
# 2 token_type_ids 句子分段信息
# 3 attention_mask 句子掩码信息
input---> {'input_ids': tensor([[ 101, 2769, 2682, 3209, 1921, 1343,    103, 2157, 1391, 7649,    119,    102]]), 'token_type_ids': tensor([[0, 0, 0, 0, 0, 0, 0, 0, 0, 0, 0, 0]]), 'attention_mask': tensor([[1, 1, 1, 1, 1, 1, 1, 1, 1, 1, 1, 1]])}

# 1 logits表示MASK预测的结果,也是一种分类概率
# 2 output.logits的分类形状 [1, 12, 21128]
# 3 通过 my_tokenizer.convert_ids_to_tokens()函数完成id2text的操作
output---> MaskedLMOutput(loss=None, logits=tensor([[[ -9.9017,    -9.6006,    -9.8032,    ...,    -7.9744,    -7.7402,    -8.2912],
                 [-14.3878, -15.0353, -14.7893,    ..., -10.0437, -10.5279,    -9.7544],
                 [-14.2215, -14.1145, -14.5770,    ...,    -6.3246,    -4.1784,    -4.6072],
                 ...,
                 [-14.6938, -16.8133, -15.1296,    ...,    -9.2327,    -8.1931, -15.2430],
                 [-10.8649, -11.4887, -11.5731,    ...,    -6.5378,    -0.8715,    -5.3870],
                 [-11.8495, -11.8358, -12.0314,    ...,    -8.4242,    -6.2741,    -8.2787]]],
             grad_fn=<AddBackward0>), hidden_states=None, attentions=None)
output.logits---> torch.Size([1, 12, 21128])
打印概率最高的字: ['她']
7.4.4 文本摘要任务
from transformers import AutoModelForSeq2SeqLM

# 文本摘要任务
def dm05_test_summarization():
    text = "BERT is a transformers model pretrained on a large corpus of English data " \
            "in a self-supervised fashion. This means it was pretrained on the raw texts " \
            "only, with no humans labelling them in any way (which is why it can use lots " \
            "of publicly available data) with an automatic process to generate inputs and " \
            "labels from those texts. More precisely, it was pretrained with two objectives:Masked " \
            "language modeling (MLM): taking a sentence, the model randomly masks 15% of the " \
            "words in the input then run the entire masked sentence through the model and has " \
            "to predict the masked words. This is different from traditional recurrent neural " \
            "networks (RNNs) that usually see the words one after the other, or from autoregressive " \
            "models like GPT which internally mask the future tokens. It allows the model to learn " \
            "a bidirectional representation of the sentence.Next sentence prediction (NSP): the models" \
            " concatenates two masked sentences as inputs during pretraining. Sometimes they correspond to " \
            "sentences that were next to each other in the original text, sometimes not. The model then " \
            "has to predict if the two sentences were following each other or not."

    # 1 加载tokenizer
    my_tokenizer = AutoTokenizer.from_pretrained(pretrained_model_name_or_path="model/distilbart-cnn-12-6")

    # 2 加载模型
    my_model = AutoModelForSeq2SeqLM.from_pretrained(pretrained_model_name_or_path='model/distilbart-cnn-12-6')

    # 3 文本转张量
    # my_tokenizer():最推荐和最灵活的方式,因为它封装了encode_plus和batch_encode_plus的功能
    # 输入可以是单个字符串,也可以是字符串列表(输入是列表会自动进行批处理)
    input = my_tokenizer([text], return_tensors='pt')
    # print('input--->', input)

    # 4 送给模型做摘要
    my_model.eval()
    output = my_model.generate(input.input_ids)
    print('output--->', output)

    # 5 处理摘要结果
    # skip_special_tokens:是否去除token前面的特殊字符
    # clean_up_tokenization_spaces:是否清理产生的空格
    summary_text = [my_tokenizer.decode(g, skip_special_tokens=True, clean_up_tokenization_spaces=True)
      for g in output]
    print('summary_text--->', summary_text)
    # convert_ids_to_tokens 函数只能将 ids 还原为 token
    # print(my_tokenizer.convert_ids_to_tokens(output[0]))
输出结果:
output---> tensor([[2, 0, 11126, 565, 16, 10, 7891, 268, 1421, 11857, 26492, 15, 10, 739, 42168, 9, 2370, 414, 11, 10,1403, 12, 16101, 25376, 2734, 479, 85, 21, 11857, 26492,
19, 80, 10366, 35, 31755, 196, 2777, 19039, 36, 10537,
448, 43, 8, 220, 3645, 16782, 36, 487, 4186, 43,
20, 3092, 10146, 26511, 1626, 80, 24397, 11305, 25, 16584,
148, 11857, 32155, 479, 7411, 51, 20719, 7, 11305, 14,
58, 220, 7, 349, 97, 11, 5, 1461, 2788, 6,
2128, 45, 479, 2]])

summary_text---> ['BERT is a transformers model pretrained on a large corpus of English data in a self-supervised fashion . It was pretrained with two objectives: Masked language modeling (MLM) and next sentence prediction (NSP) The models concatenates two masked sentences as inputs during pretraining . Sometimes they correspond to sentences that were next to each other in the original text, sometimes not .']
Tips: tokenizer()、encode()、encode_plus()和batch_encode_plus()对比
| 方法名称 | 输入类型 | 返回信息 | 是否支持批处理 | 推荐使用场景 | 备注 |
|---|---|---|---|---|---|
tokenizer() (直接调用) |
str或List[str] |
BatchEncoding (字典) |
是 | 最推荐,最灵活,处理单个或批量,返回所有必要信息。 | 封装了 encode_plus 和 batch_encode_plus 的功能。 |
encode() |
str或List[str] |
List[int] (input_ids) |
否 | 不推荐用于模型输入,除非你只关心 token ID。 | 不返回 attention_mask 或 token_type_ids。 |
encode_plus() |
str或List[str] |
BatchEncoding (字典) |
否 | 编码单个序列或序列对,并获取所有必要信息。 | 功能上与直接调用 tokenizer() 编码单个输入相似。 |
batch_encode_plus() |
List[str]或List[Tuple[str, str]] |
BatchEncoding (字典) |
是 | 编码多个序列或序列对,并获取所有必要信息,高效。 | 功能上与直接调用 tokenizer() 编码批量输入相似。 |
7.5 具体模型方式完成NLP任务
具体模型方式在机器学习和深度学习中通常指的是不同的模型架构或方法,具体可以包括模型的构建、训练、调参、评估等方面。根据任务的性质,选择不同的模型方式可以优化性能、提高效率
直接使用特定模型类(如
BertModel、GPT2Model等)来加载和操作模型。与自动模型方式(
AutoModel)相比,具体模型方式更加明确和直接,适合对模型结构有深入了解的用户。如果你需要修改模型结构(如添加自定义层)、访问模型的内部组件(如注意力权重、隐藏状态等)、对模型的结构有深入了解,并希望代码更加明确,具体模型方式更适合。
优点
- 明确性:直接使用模型类,代码更易读和理解。
- 灵活性:适合对模型进行修改或扩展(如添加自定义层、修改注意力机制等)。
- 细粒度控制:可以访问模型的内部组件,进行更深入的分析或调试。
缺点
- 代码复杂度高:需要更多的代码来实现完整的推理流程。
- 学习曲线陡峭:需要了解具体模型的结构和输入输出格式。
- 不适合快速实验:对于简单的任务,使用管道方式或自动模型方式更高效。
7.5.1 完型填空任务
from transformers import BertTokenizer, BertForMaskedLM


# 具体模型完型填空任务
def dm01_test_bert_fill_mask():
    # 1 加载tokenizer
    modename = "model/bert-base-chinese"
    my_tokenizer = BertTokenizer.from_pretrained(modename)

    # 2 加载模型
    my_model = BertForMaskedLM.from_pretrained(modename)

    # 3 文本转张量
    input = my_tokenizer.encode_plus('我想明天去[MASK]家吃饭', return_tensors='pt')
    print('input--->', input)

    # 4 给模型送数据提取特征
    my_model.eval()
    output = my_model(**input)
    print('output--->', output)
    print('output.logits--->', output.logits.shape) # [1,11,21128]

    # 5 取概率最高
    mask_pred_idx = torch.argmax(output.logits[0][6]).item()
    print('打印概率最高的字:', my_tokenizer.convert_ids_to_tokens([mask_pred_idx]))
输出结果:
# input_ids表示text2id后结果 # token_type_ids表示句子分段信息 # attention_mask表示句子attention掩码信息
input---> {'input_ids': tensor([[ 101, 2769, 2682, 3209, 1921, 1343,    103, 2157, 1391, 7649,    102]]), 'token_type_ids': tensor([[0, 0, 0, 0, 0, 0, 0, 0, 0, 0, 0]]), 'attention_mask': tensor([[1, 1, 1, 1, 1, 1, 1, 1, 1, 1, 1]])}

output---> MaskedLMOutput(loss=None, logits=tensor([[[ -8.1771,    -8.1008,    -8.1191,    ...,    -6.8355,    -6.9482,    -6.9834],
                 [ -8.2775,    -8.1251,    -8.1655,    ...,    -6.8471,    -7.4265,    -6.1365],
                 [-14.1093, -13.1037, -14.6324,    ...,    -6.0959,    -3.7550,    -5.7456],
                 ...,
                 [-16.2103, -16.7243, -15.9876,    ...,    -5.9727,    -8.2757,    -7.3852],
                 [-13.5615, -13.7670, -13.4497,    ...,    -7.8282,    -4.9095,    -9.1699],
                 [-10.3200, -10.1068, -10.4439,    ...,    -6.6468,    -7.0597,    -7.5027]]],
             grad_fn=<AddBackward0>), hidden_states=None, attentions=None)

output.logits---> torch.Size([1, 11, 21128])
打印概率最高的字: ['你']
7.6 总结
| 特征 | 具体模型类 (Specific Model Classes) | 自动模型类 (AutoModel Classes) | pipeline 方式 (Pipeline API) |
|---|---|---|---|
| 抽象级别 | 最低层:直接模型架构 | 中间层:自动识别模型架构和任务头 | 最高层:封装整个端到端推理流程 |
| 易用性 | 最复杂:需要手动处理预处理、后处理 | 较简单:自动加载模型和分词器,仍需手动处理输入和输出 | 最简单:一键式操作,从输入到输出 |
| 灵活性 | 最高:完全控制模型内部,适合研究和定制 | 高:方便切换模型,仍可自定义输入和输出 | 最低:开箱即用,但定制化能力有限 |
| 控制力 | 对模型层级、权重、输入输出有最大控制 | 对模型和分词器对象有直接控制 | 对整个流程的控制较少,大部分细节被隐藏 |
| 任务支持 | 基础模型或带特定任务头模型(需手动选择) | AutoModelFor... 类自动加载带任务头的模型 |
针对特定任务预设了整个流程(推荐) |
| 适用场景 | 深度定制、模型训练、研究、底层开发 | 快速原型开发、模型切换、微调、需要自定义输入和输出 | 快速应用、演示、生产环境中的标准任务推理 |
| 输入/输出 | 原始输入/输出(如input_ids, logits),需手动处理 |
原始输入/输出,需手动处理 | 友好型输入/输出(如文本字符串,直接返回解析好的结果) |